
Winter Sowing in Milk Jugs: A Simple Outdoor Seed-Starting Method for Spring
Last updated: January 2026
TL;DR
Winter sowing uses recycled containers (like milk jugs) as mini greenhouses to start hardy seeds outdoors in winter. The seeds stay protected and naturally germinate when conditions are right, producing tough seedlings with little indoor equipment.
Quick guidance
Winter sowing is outdoor container seed-starting: sow hardy seeds in moist potting mix inside a vented milk jug, leave it outside through winter, and let natural cold and warming trigger germination. Start with brassicas, greens, and hardy herbs; keep jugs labeled, drained, and vented. In spring, increase airflow and transplant once seedlings have true leaves and outdoor conditions match the crop.
The Full Scoop
If indoor seed starting for spring feels like an entire second job, with grow lights, heat mats, and daily watering checks, then winter sowing may be exactly the technique you need. Winter sowing is a simple method that uses recycled containers (like milk jugs) as mini greenhouses to start hardy seeds outdoors during winter. The seeds experience natural cold and moisture, then germinate on their own schedule as conditions become favorable in late winter and early spring.
This approach is especially appealing for gardeners who want strong seedlings without the fuss. Instead of forcing growth inside under imperfect light, you’re letting nature time germination for you.
In fact, the technique is so hands-off that the first year I tried it, I actually forgot the seeds were out there! (Flashback to me seeing them in the early spring, clearly germinated and grown inside their little containers and screaming to be planted.)
What winter sowing is (and what it’s not)
Winter sowing is not just sprinkling seeds onto frozen ground and hoping for the best. It’s a controlled setup, but one that’s more “set it and forget it” than indoor seed starting:
Seeds are sown in moist potting mix inside a translucent container.
The container is vented and left outdoors.
Snow and rain provide moisture; the container moderates wind and temperature swings.
As days lengthen and the sun strengthens, the container warms enough to trigger germination.
It’s best thought of as outdoor container seed starting that relies on seasonal cues rather than indoor equipment. The seeds are germinating at the proper time with no intervention from the gardener. How cool is that?
Why it works
Many plants naturally drop seed in fall. Those seeds sit outside all winter, experiencing cold, moisture, and freeze–thaw cycles. For some species, especially many perennials, this cold period helps “unlock” germination. Even for seeds that don’t require cold stratification, winter conditions can keep them dormant until spring warmth arrives.
The container does three big jobs:
Protection: keeps seeds from washing away, being eaten, or drying out.
Moisture management: allows precipitation in while reducing evaporation.
Temperature buffering: warms faster than open soil on sunny days but still tracks seasonal shifts.
Best seeds for beginners
Not every crop is a great fit, but a surprising number are. Start with hardy, cool-season plants and expand later. Ideally, we don’t want to plant warm-season annuals that may sprout prematurely during an unusually warm winter week, only to freeze the next week and meet their demise.
Excellent winter sowing candidates:
Brassicas: kale, broccoli, cabbage, cauliflower, Brussels sprouts
Leafy greens: spinach, lettuces, mustards, Asian greens
Herbs: parsley, chives, oregano, thyme (and sometimes cilantro)
Perennial flowers and natives: coneflowers, rudbeckia, milkweed, bee balm, coreopsis
It’s not that you can’t start warm-season annuals this way, just that you should wait until closer to your last frost date in the spring. Once you’ve got the hang of the early cold-hardy stuff, give those heat lovers a try!
Save these for later:
Tomatoes, peppers, eggplant
Basil
Cucumbers, squash, melons
These warm-season crops can work if sown very late winter or very early spring, but they’re not the easiest place to begin. Expect some trial-and-error with your starting dates.
When to winter sow
Timing depends on climate, but a practical rule is: start when winter is established and you’re unlikely to have extended warm spells that trigger early sprouting. For most areas, these generally means any time after the winter solstice. But, if you’re in a warmer climate, you may need to wait a bit longer.
Colder climates often begin in late December through February.
Moderate climates often do best in January or February.
Mild climates may need a later start or very careful crop selection to avoid premature germination.
If you’re unsure, begin with perennials and hardy greens first, and save borderline crops for later.
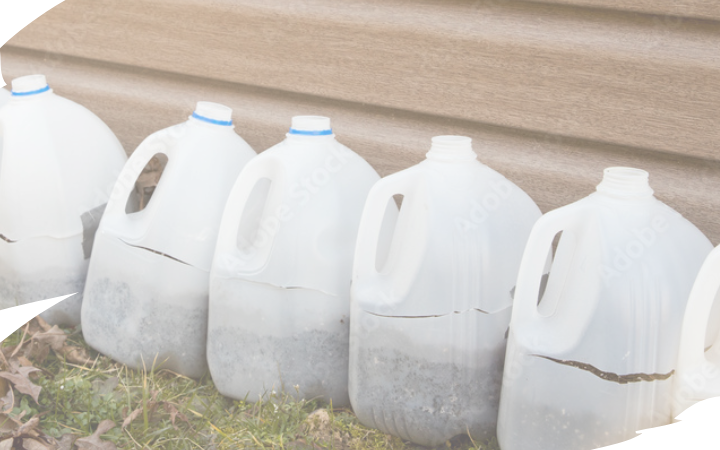
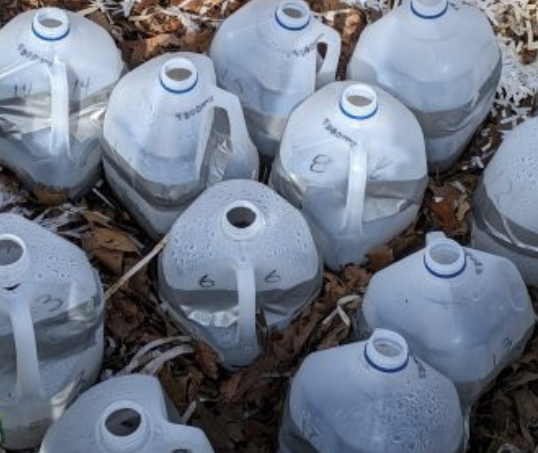
Step-by-step milk jug method
Most supplies needed for winter sowing are readily available around your house. A little forethought for collecting containers is helpful, depending on how many seeds you’ll start. Gather:
Clean, translucent gallon jug (milk, water, or juice)
Potting mix or seed-starting mix (not garden soil)
Knife/scissors + something to poke drainage holes
Duct tape or strong packing tape
Weatherproof labels + permanent marker
Seeds + water
1) Cut the jug
Cut around the jug a few inches above the base, leaving a “hinge” under the handle so it opens like a clamshell.

2) Add drainage
Poke 4–8 holes in the bottom. Drainage matters - seeds rot in soggy mix.
3) Add moist mix
Fill with about 3–4 inches of damp mix (wrung-out sponge damp).
4) Sow seeds
Plant at the depth recommended on the packet. Small seeds often need only a light covering. Spacing isn’t very important here. It’s okay to plant them very close together and separate them at transplanting time. This is often referred to as the “hunk o’ seedlings” method.
5) Label like you mean it
Label inside the jug and outside if possible: crop, variety, date.
6) Close and tape
Tape the cut seam shut. Leave the cap off for ventilation and moisture entry.
7) Place outdoors
Set jugs in a sunny, wind-protected spot. Cluster them to prevent tipping.
Care through winter (minimal, but not zero)
Most of the time, you’ll do very little. Check occasionally:
If the mix is bone dry (common in very dry winters), water gently on a day above freezing.
If you get a warm stretch in late winter, watch for overheating and vent the containers, if necessary.
Spring management: ventilation and transplanting
Once seedlings emerge, your job changes:
Vent on warm days. Prop open the jug or add extra air holes to prevent “cooking.”
Water more regularly. Growing plants use more moisture than dormant seeds.
Transplant at the right stage. When seedlings have true leaves and conditions suit the crop, transplant to beds or larger pots.
Because these seedlings were raised outdoors, they usually need minimal hardening off. Open the jug to allow exposure to the wind and other elements for several days before moving seedlings to their permanent garden home.
Alternate Containers
Milk jugs aren’t the only container we can use for winter sowing. Large leafy greens containers with lids, re-usable plastic totes, even plastic storage bags can be used if set up correctly. The main thing is to be sure the plastic is clear or semi-translucent, it can hold around 3” to 4” of soil, it can let moisture in, can be vented on hot days, and there is space at the top with the cover on for the seedlings to grow. Use what you have available, experiment, and see what works for you.
Common problems
Nothing germinated: it could be old seed, the soil may have been too dry, or it’s simply not warm enough yet. This is especially true of perennials that need specific conditions to breakdown the seed coat and then sprout, so be patient.
Mold or algae: generally caused by too much moisture. Increase airflow and avoid overwatering.
Seedlings fried: add ventilation sooner during sunny weather. This is the one thing that needs some attention pretty frequently in some areas. (Still not as much as an indoor set up, though!)
Crowding: It’s okay to sow thickly within the container, but there is a limit. Plants still need space for airflow and proper growth. Thin the sprouts to give them more room or transplant them out earlier if the weather allows.
FAQ
Does winter sowing replace indoor seed starting?
Not entirely. It excels for hardy crops and many flowers; warm-season crops usually still do best indoors.
Do I need special “winter sowing” seeds?
Nope, use standard seed. Focus on cold-tolerant crops first.
Do jugs need sun in winter?
Yes. Light helps warm the container in late winter/early spring when germination begins. A minimum of 6 hours per day is best.
When do I open the jugs?
Start venting once seedlings emerge and sunny days warm the container; open more as temps rise.
Will seedlings survive snow?
Yes. Snow often insulates. The container protects seedlings from wind and rapid swings.
Want the full walkthrough?
If you’d like more detailed crop suggestions, troubleshooting, and timing tips, listen to the podcast episode “Winter Sowing 101” for a full, step-by-step audio guide. You can also find it on YouTube.
Your Friend in the Garden,

Karin
Everything I write about is evidence- or experience-based. Here are some university resources to read for more info.
References:
Penn State Extension. “Starting Seeds in Winter.” 2025.
– Overview of winter sowing in containers outdoors, including timing, container choices, and crop suggestions.
University of Missouri Extension. Winter Sowing Seeds (YM105), 2021.
– Discusses winter sowing as a method for late-winter seed starting in mini greenhouses for spring transplanting.
Piedmont Master Gardeners. “Winter Sowing: Easy, Productive, Enjoyable.”
– Article on using winter’s natural stratification, with emphasis on perennials and native plants.
Karin Velez is the garden educator behind Just Grow Something. She holds a degree in Horticulture from Oregon State University and is a specialty crop farmer and garden consultant with 20 years of gardening experience. Through her podcast, articles, courses, and workshops, Karin helps home gardeners grow more food with practical, evidence-based methods, turning research and real-world experience into clear steps that work in everyday gardens. Outside sources and references are always included when they’ll help you dig deeper.